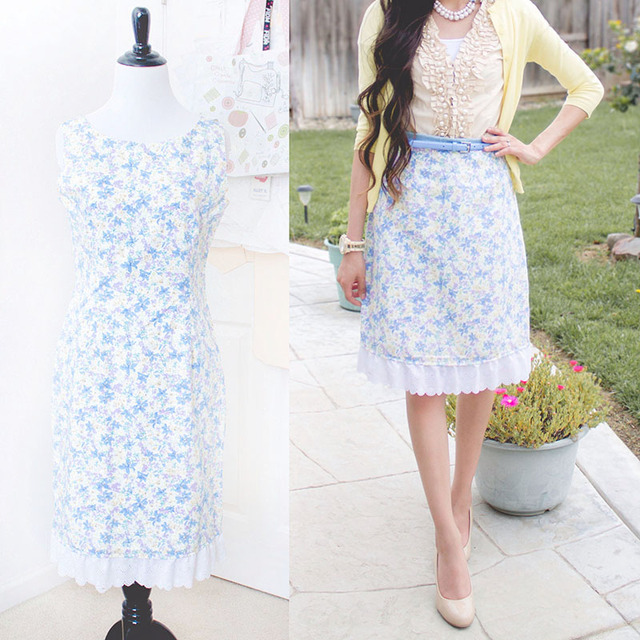
Introduction to Transforming a Dress into a Skirt
How to make a dress into a skirt is a creative and cost-effective way to refresh your wardrobe. Whether you have an old dress that no longer fits or a new one that you want to repurpose, transforming it into a skirt can breathe new life into the garment. This guide will walk you through the process step by step, ensuring that you achieve a professional and stylish result. From selecting the right dress to finishing touches, we’ll cover everything you need to know.

Selecting the Right Dress
Transforming a dress into a skirt starts with selecting the right dress for the project. You should look for a dress that features a simple and straightforward design. Opting for a straight or A-line silhouette usually works best because these styles provide a clean base for creating the skirt. Avoid dresses with complex patterns or layers since these elements can complicate the transformation process and make it more challenging.
When considering the fabric type, prioritize materials such as cotton, denim, or jersey. These fabrics are generally easier to work with compared to silk or chiffon, which may require more expertise and additional tools. Additionally, before making your selection, ensure that the dress is in good condition. Look for any significant stains or tears that may hinder the final result of your new skirt.
By carefully choosing the right dress, you lay a solid foundation for a successful transformation, setting yourself up for a rewarding and creative DIY project. Moving forward, you can explore the actual steps for converting that dress into a stylish skirt, but remember that your choice of dress is crucial in achieving the desired outcome.
Gathering Materials and Tools
Transforming a dress into a skirt requires a few basic materials and tools. You will need scissors, a measuring tape, pins, and either a sewing machine or needle and thread. Additionally, fabric markers can be helpful for marking your cutting lines. If you want to enhance the structure of your new skirt, you might consider using interfacing as an optional extra. For those who prefer a more professional finish, a serger can be useful for clean edges, while a rotary cutter can offer precise cutting.
To start the process, first gather all your tools and materials. Make sure you have a comfortable workspace that provides good lighting, as this will make working on your project easier. A flat surface is essential for laying out the dress, which will help you visualize the transformation into a skirt.
Once you have everything in place, carefully examine the dress you plan to alter. Consider which sections you want to keep as part of the skirt and how you will handle the top portion of the dress. Next, use the measuring tape to determine the desired length for your skirt and mark it with fabric markers. After that, pin the fabric to secure it, ensuring accuracy as you prepare to cut.
Now, grab your scissors and confidently cut along the marked line. If you’re using interfacing, apply it to the top edge of the skirt for added support. As you sew the new waistband or top edge, remember to keep the fabric aligned to achieve a clean finish. Once you’ve secured everything in place, take a moment to admire your handiwork and check for any necessary adjustments.
By being organized and methodical, you will successfully transform a dress into a stylish skirt, showcasing your creativity and sewing skills. Enjoy wearing your new creation, knowing that you put your own unique touch on it!

Measuring and Marking the Dress
How to make a dress into a skirt involves careful measuring and marking. Start by trying on the dress to determine the desired length of the skirt. Use a measuring tape to mark the hemline at the desired length, ensuring it is even all around. If you want a specific hem length, measure from the waistband down to the desired hem point. Mark this point with pins or fabric markers. For a more precise fit, you can also mark the waistline where the new waistband will be attached. Accurate measurements are crucial for a well-fitted skirt.
Cutting the Dress
How to make a dress into a skirt includes cutting the dress to the desired length. Lay the dress flat on a work surface and use the marks you made as a guide. Carefully cut along the marked line, ensuring the cut is straight and even. If you are using a rotary cutter, place a cutting mat underneath to protect your work surface. For a cleaner edge, consider using pinking shears to prevent fraying. After cutting, try on the skirt to ensure the length is correct and make any necessary adjustments.
Creating the Waistband
How to make a dress into a skirt involves creating a new waistband. Cut a strip of fabric for the waistband, typically about 2 inches wide and the length of your waist plus 1 inch for seam allowances. Fold the strip in half lengthwise, right sides together, and sew along the long edge. Turn the waistband right side out and press it flat. Attach the waistband to the top edge of the skirt, pinning it in place and ensuring it is even. Sew the waistband to the skirt, leaving a small opening for turning. Turn the waistband to the inside of the skirt and sew it down, closing the opening. Adding a hook and eye closure or a button can secure the waistband.
Hemming the Skirt
Transforming a dress into a skirt is a rewarding DIY project that can enhance your wardrobe. To start, evaluate the dress to determine the desired length for your skirt. Once you’ve decided on the length, cut the dress carefully, ensuring you leave enough fabric for a hem.
Next, turn your attention to hemming the skirt for a polished finish. To do this, fold the bottom edge of the skirt upwards by about 1 inch. At this point, it’s essential to press the fold in place. Pressing not only helps to create a clean crease but also makes the sewing process much easier.
After pressing, use pins to secure the hem. This will keep it in place as you sew, preventing any misalignment. When you’re ready to sew, create a straight stitch along the folded edge of the hem. If your sewing machine has a blind hem stitch feature, consider using it for a cleaner look. This type of stitch allows the hem to remain nearly invisible on the outside of the skirt, providing a more professional appearance.
Alternatively, if you prefer hand-stitching, use a slip stitch to achieve an invisible hem. This technique requires a bit more time but can result in a beautifully finished edge. As you stitch, take small, even stitches to ensure consistency and strength.
Once you’ve completed the hemming, it’s crucial to double-check the hem to ensure that it is even and secure. Lay the skirt flat and inspect the hem all around. Adjust any uneven areas as necessary, as a well-hemmed skirt not only appears professional but also lasts longer through regular wear.
In conclusion, by following these steps, you can successfully transform a dress into a stylish and well-finished skirt. Enjoy the creative process, and take pride in wearing something you made yourself!

Finishing Touches and Additional Details
Transforming a dress into a skirt involves several steps, including adding finishing touches and optional details. Start by trimming any excess fabric and threads to clean up the edges, ensuring a polished look. Next, take the time to press the skirt with an iron, which will remove any wrinkles and help set the seams neatly.
If you wish to make the skirt more unique, consider adding decorative elements such as lace trim, ribbon, or appliqués. These personal touches can truly enhance the garment’s visual appeal. Once you have made these enhancements, it’s important to check the fit of the skirt. Try it on and make any final adjustments, such as altering the waistband or hem, to achieve the best fit possible.
With these finishing touches complete, your newly created skirt will be ready to wear and showcase your personal style. Enjoy the sense of accomplishment and creativity that comes from transforming an old dress into something fresh and enjoyable!


